Some Assembly Required
The reality of it is, Acoustical Solutions focuses on correcting noise problems for whole rooms, large industrial equipment, or broader scopes in general. But what if you have a small thing in your garage like a Air Compressor, Electrical Generator, or whatever — and it’s just obnoxiously loud to you? We really don’t have a specific soundproof box to sell you, because there are so many small, loud machines in the world, with so many different sound requirements and air/exhaust requirements that it’s just not efficient to have a cookie cutter solution for that problem from a manufacturer’s point of view. Nothing personal. It’s just business.
However, I can tell you how to make one for yourself, and for not a whole lot of money, utilizing typical building materials and a few of our products.
Disclaimer: Don’t hurt yourself. Please use good common sense about your own abilities before trying any of this. Also, certain items require adequate ventilation which I will cover, but I can’t be all inclusive to every device on the planet. Anything that burns fossil fuels of any kind will create carbon monoxide and must be ventilated. I don’t recommend covering those items unless you are an experienced Do-it-Yourselfer. If it’s an electrical plug-in device, it is far safer, but you also run the risk of overheating your unit.
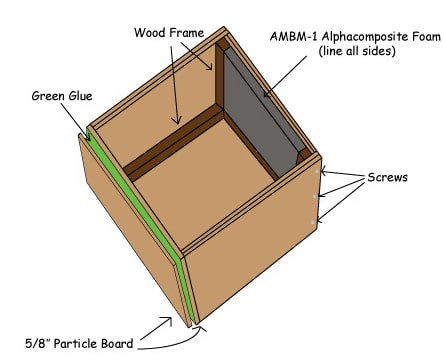
Okay, with that out of the way, if you are still interested in taking any and all associated risks into your own very capable hands, let’s begin.
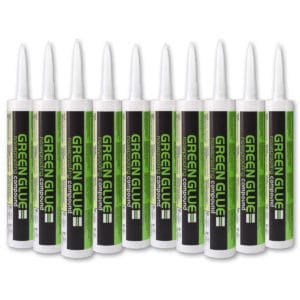
Heavy things stop sound. Particle board is pretty heavy stuff. Basically, you want to build a 5-sided box with an open bottom to go over the widget. Use two layers of 5/8″ particle board with Green Glue in between and screw them to a simple 1×1 frame inside the box. Line the inside of the box with 1-3/8″ thick mass loaded vinyl composite foam. Along the bottom edge (that is resting on the floor) apply the peel and stick a door jamb seal to the bottom. On the outside, caulk all the seams where one wall meets another with acoustical caulk.
That’s it, that’s the sound barrier. It will, at the very least, cut the sound by about 75%.
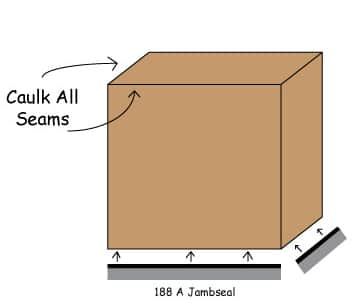
Now the trick is to get things in an out of the box like wires, tubing, or air intakes and exhaust, without ruining the soundproof box. Remember: A one percent gap will transmit fifty percent of the sound!
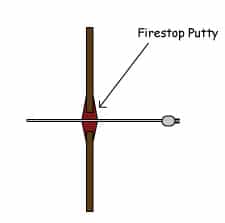
Putty pads are your friend. All by themselves they stop 50 dB, which is huge. Any hole you drill into this box needs to have fire stop putty on the inside and outside of the box perfectly sealing against whatever it is that is penetrating through the box.
Air intake and exhaust. If at all possible, run these to outside air, especially if there is carbon monoxide in your exhaust from your “widget.” Acoustical Solutions has probably some of the coolest air flow silencers I have ever seen and am happy to recommend them. Sound VAC inline duct silencers act kind of like a gun silencer in that they all air to pass through the center completely unimpeded, and yet bleeds off as much as 33 dB of sound over the 5′ distance. I recommend the 6″ diameter version, its stops the most sound and is the cheapest.
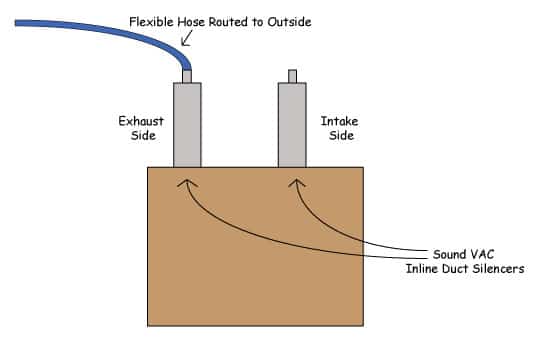
They are 5′ long though, and you have to work with that, but for the cost and ease of installation into “The Box”, you can’t beat it. Attach and lead a hose to the outside if you are working indoors.
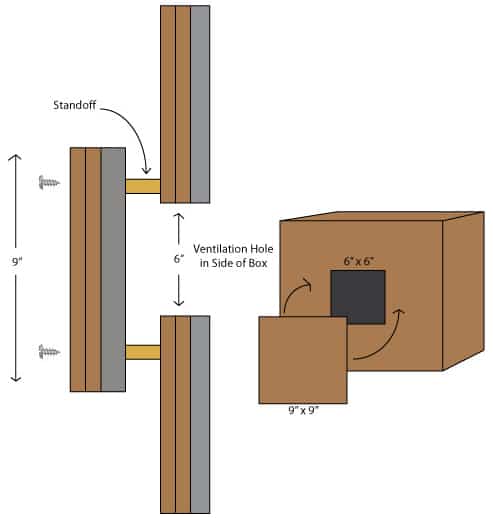
Another ventilation solution would be to cut a 6″ x 6″ hole in the side of the box. Make a 9″x 9″ piece of your 2-layer particle board with foam on one side. Get some 3″ or 4″ standoffs from a hardware store. Mount the 9″ x 9″ piece directly in front of your 6″x 6″ hole. Sound doesn’t like to make 90 degree turns. You are forcing it to reflect off of very absorbent foam before it leaves the box, greatly reducing the energy the sound waves carry with them as they leave. “The Box” won’t be as soundproof as it could have been with that setup, but again, if it needs that ventilation, it needs it. Your common sense governs this.
Some accoutrements: If you know electronics fairly well, and all you have on your widget is a simple on/off switch, you could very easily run some wires up to a toggle switch you mount on top of “The Box” and operate it from the outside. You can also add a digital thermometer, so you can precisely see what the temp is inside. This will help you gauge whether or not it’s within tolerance for your widget.
One other thing, if your widget is vibrating in some way, concrete is actually much more elastic than you think. Your best bet is to get some heavy-duty isolation pads for underneath it.
So, if you have any questions or suggestions for improving this setup, I’d love to hear about it. Thanks!
To learn more about how Acoustical Solutions can solve your noise control problems, use our contact form, call one of our Acoustical Sales Consultants at (800) 782-5742, or visit us on the web at acousticalsolutions.com.


Matt, I just want to thank you for that fantastic how-to on soundproofing small loud machines.
I bought an Everpure carbonator + faucet for a total of about $3000. It was advertised as “whisper quiet” but it was more like a Whisperjet.
Since I could not return the unit, I thought I was going to have to resell it at a $1-2K loss. Then I found your blog post.
I installed this in an ordinary cabinet next to my kitchen sink. The space was very small, about 24” x 24” x 13”, so I did not have a lot of room to work with. Hence I had to modify your design. I doubled the cabinet panels with fiberboard, using silicone caulk between them (I could not find Green Glue in a small quantity anywhere). Then I covered all the surfaces with a mass-loaded vinyl + acoustic foam product about ⅜” thick. This thing generates a lot of heat, so I had to ventilate it to the outdoors. I used a standard dryer vent, lined inside and out with some of that ⅛” dense sound-deadening material made for cars. I bought a temperature-controlled 45 cfm USB-powered fan to push the heat out. It’s powerful enough in winter, but I may need to get a more powerful one once I see whether it’s adequate in summer. I made intake ventilation holes near the other end of the cabinet, and built a standoff – in my case a 5-sided box, lined with the same mass-loaded vinyl product, leaving about 10 square inches open on one side for intake.
The before-and-after difference was phenomenal. I didn’t measure it, but it went from being about 70db (conversation-limiting) to being so quiet that it’s really not noticeable if the refrigerator is on or you’re just not paying attention.
I can’t thank you enough – that blog post is a real public service!
Best,
Paul Edwards
Larry,
You are correct, this really isn’t a design for the outdoors. You may be better off getting Outdoor rated Acoustical Blankets for this and putting it together using an angle iron frame and screwing the blankets on with self tapping screws, like out ABBC-13EXT Sound Blankets. Ventilation will still be an issue, but we have custom solutions for that. May want to give the office a call and go that route. Or, as you said, there are ways to make the above more hardy to the elements, but you are right, green glue doesn’t like to be super cold.
A couple of comments regarding the design of the generator enclosure described above. The basic design is good but I have questions about the materials recommended for use.
1. Assuming that the generator that the enclosure is being built for will be operated in an outdoor environment, is particle board (MDF) the best material to use on the exterior of the enclosure (when particle board gets wet it swells and deteriorates)? Would it be better to have the exterior layer made from something that can withstand water better (i.e Marine plywood)?
2. Green glue between the layers of particle board seems to be a good idea at first, but green glue only works properly at room temperatures (65-85 degrees F). At colder temperatures (i.e. winter in northern states)the green glue may not be effective. Is there a better material to use for dampening between the two layers?
Thanks you so much for this post. I’ll use this information for my own soundproofing.